


 Our latest tutorial shows how to add the reference-class conversion of the RME ADI-2 DAC FS and ADI-2 Pro FS R to your recording setup.

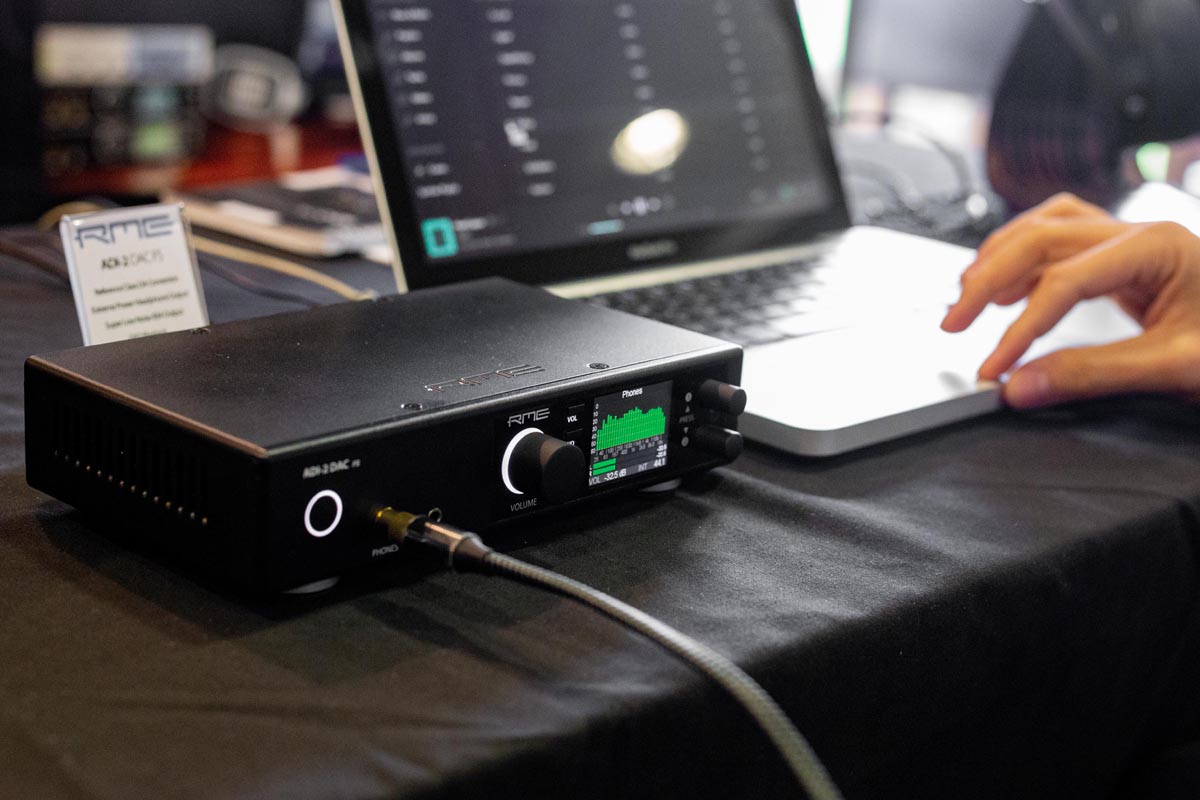
Featuring class-leading conversion, Extreme Power Headphone output stage and high performance DSP, the RME ADI-2 DAC FS and RME ADI-2 Pro FS R are the flagship models of RME’s 2-channel AD/DA converter range.
RME’s signature sound signature is at the heart of the ADI-2 Series, providing AD/DA conversion that reproduces any signal in incredible detail, whilst still retaining all of the sonic qualities of the source material witout any colouration.
In our latest tutorial, we show you how to combine the RME ADI-2 DAC FS and ADI-2 Pro FS R with an audio interface – such as the RME Babyface Pro FS – to take advantage of the incredible ADI-2 conversion for a high-end monitoring and headphone solution.
Watch the full tutorial below, or scroll down for a full text walkthrough. We’ve used the Babyface Pro in our example, however you can easily connect either device with any interface that features ADAT, SPDIF or AES-3 connectivity.
Table of contents
(Video) How to connect the RME ADI-2 DAC FS and Pro FS R to an audio interface
(Text version) How to connect the RME ADI-2 DAC FS to an audio interface
(Text version) How to connect the RME ADI-2 Pro FS R to an audio interface
(Text version) How to use the RME ADI-2 DAC or Pro FS R in Class Compliant mode
How to connect the RME ADI-2 DAC FS and ADI-2 Pro FS R to an Audio Interface
See more videos at Synthax TV
 How to connect the RME ADI-2 DAC FS to an audio interface
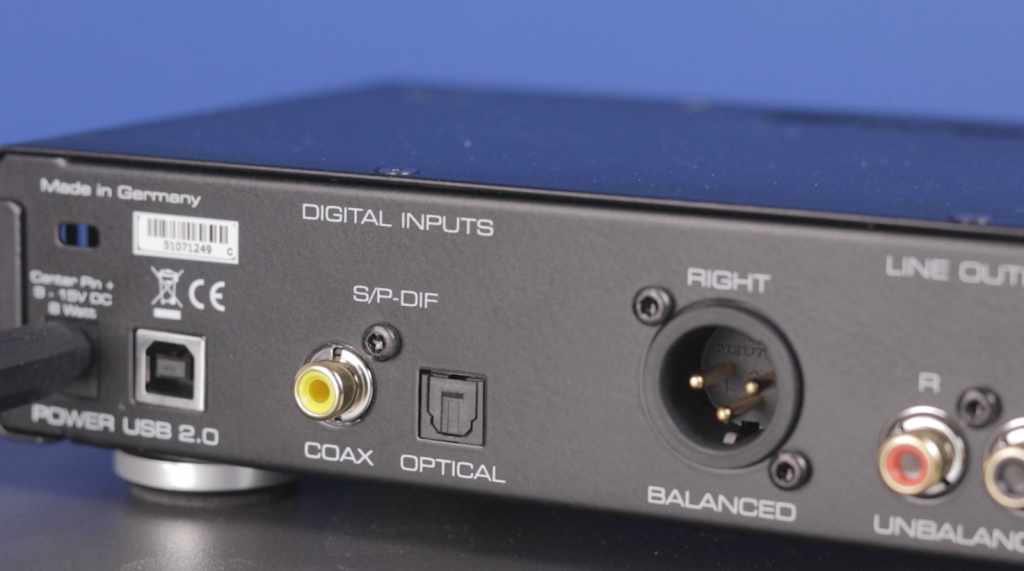
The simplest way to connect your ADI-2 DAC FS to an audio interface is via the SPDIF coaxial or optical connection. The majority of RME audio interfaces feature optical I/O (inputs and outputs), which allows for the connecting of external devices digitally (via the 2-channel SPDIF format, or the 8-channel ADAT format).
As we’ve used a Babyface Pro in our example we’re using an optical TOSLINK cable, which are inexpensive and easy to find online. The digital audio signal is then routed from the Babyface to the DAC, where it will be converted to an analogue signal for playback.
Connecting the RME ADI-2 DAC FS and Audio Interface
To reiterate, we’re connecting via optical SPDIF / the first two channels of ADAT, however if your interface features coaxial SPDIF or AES, these formats will also be recognised by the DAC, providing you use the correct cabling. For AES, this will most likely be an AES-3 (female) to SPDIF phono cable.
1 – Connect the TOSLINK cable from the ADAT OUT on your interface to the OPTICAL IN on the ADI-2 DAC FS.
2 – As soon as connection is made, the DAC will automatically use the optical output. The Status screen on the DAC can be used to verify this connection, click the encoder marked “B” on the DAC until you find the “State Overview” menu.
RME Fireface Settings
Users of RME Interfaces will be familiar with the RME Fireface Settings dialogue, which allows for a number of settings changes to be made for your interface (such as clock source and sample rate).
1 – Find “Clock Source” and make sure this is set as “Internal”.
2 – The sample rate can be changed here too. For the tutorial, this is set at 48kHz, but can be changed to any sample rate from the drop-down.
Please note that if you aren’t using an RME interface, you won’t have access to RME Fireface Settings. Instead, configuraton would be done using your interface manufacturer’s method. Check your interface’s manual to find out how this is achieved.
 Configuring TotalMix FX
Routing audio from our RME audio interface to the ADI-2 DAC FS is simple thanks to TotalMix FX, which provides real-time audio routing capabilities for all channels on an RME interface or sound card.
Similarly to the Fireface Settings program, if you aren’t using an RME interface, you won’t have access to TotalMix. Refer to your interface’s manual to find out how to route audio to the DAC from your interface.
It’s worth noting that in the tutorial video the ADI-2 DAC is attached to output AS 1 / 2. This is because on the Babyface Pro, the digital output combines both the ADAT and SPDIF formats (hence the A in AS being ADAT and the S being SPDIF).
On other interfaces, this might be shown as ADAT 1 / 2. Likewise, if you have chosen to use another format like AES, you will need to use the AES output in TotalMix.
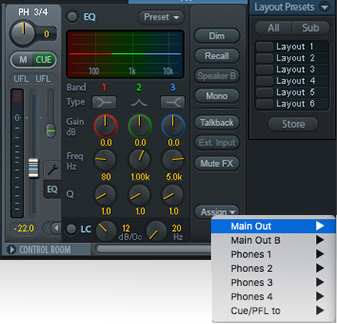
TotalMix also features a Control Room section, which offers a number of parameters typical of a recording studio’s Master section, including functions like Monitor Dim and Mono.
We’ll make use of these features by assigning our AS 1 / 2 channels as the Main Output in TotalMix (which is being fed to the ADI-2 DAC FS).
1 – Find the Control Room section in the bottom right of Totalmix.
2 – Click the “assign” button and from the “Main Out” list and select AS 1 / 2 (or ADAT 1 / 2, depending on your interface). We’d also recommend turning the fader all the way down at this point (or the volume on your DAC fully down), to make sure you don’t accidentally send a very loud signal to your DAC.
3 – Now that the Main Out is set, we’re going to route some audio to the DAC.
4 – The sub mix for the Main Out should also now be selected (as indicated by a slightly lighter gray colour), but if not simply click anywhere around the fader to select it.
5 – Play back some audio from your Mac or PC, the level of which will be shown in the Software Playback row (middle row of TotalMix).
6 – Turn up the fader attached to this channel to route the signal to the Main Out, which should now also be receiving a signal.
7 – Now slowly turn up the Main Out’s fader, to send this signal to the ADI-2 DAC, and if neccesary turn up the volume on the DAC. The audio signal should be visible on the DAC’s spectral analyser, as well as being audible through any monitors or headphones you have connected to the DAC.
How to connect the RME ADI-2 Pro FS R with an audio interface
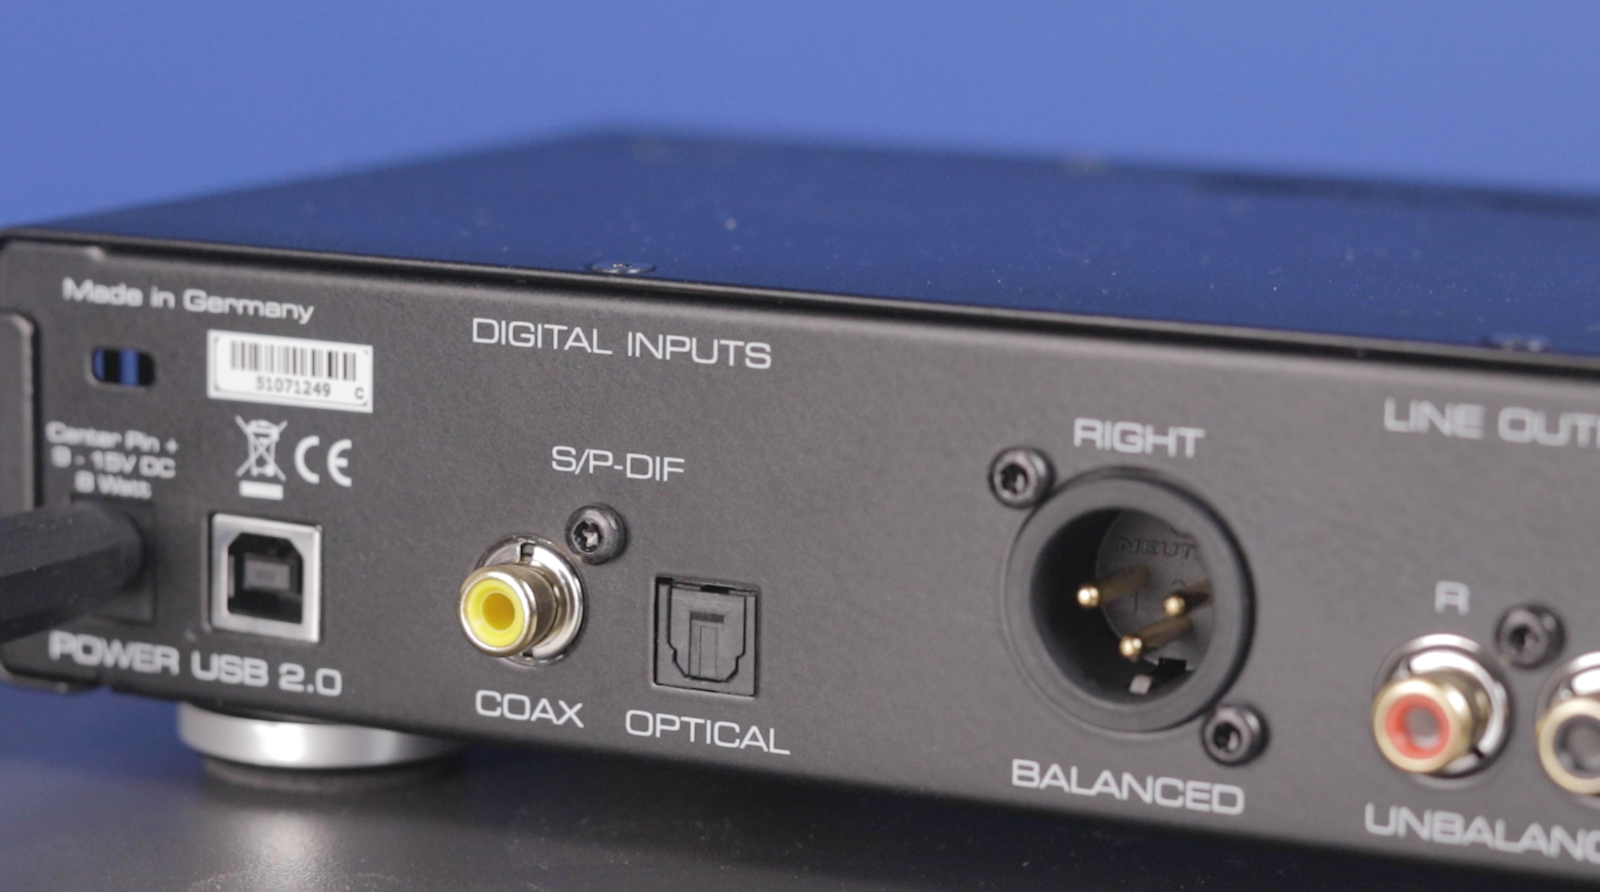
For the ADI-2 Pro FS R, we’re once again using optical TOSLINK cables to route audio to (and from) the ADI-2 Pro and the Babyface.
To connect the RME ADI-2 Pro FS R to your interface, you’ll need two TOSLINK cables – one cable for the input, and one for the output. As with the DAC, the ADI-2 Pro FS R also supports the SPDIF and AES-3 digital audio formats. Just make sure you’re using the right cables for your preferred connection method.
Connecting the RME ADI-2 Pro FS R and Audio Interface
1 – Connect one TOSLINK cable from the ADAT OUT on your interface to the OPTICAL IN on the ADI-2 Pro FS R.
2 – Connect the other TOSLINK cable from the ADAT IN on your interface to the OPTICAL OUT on the ADI-2 Pro FS R.
 Configuring the RME ADI-2 Pro FS R
To take advantage of RME’s SteadyClock FS, I’ll be using the Pro as the device that our clock signal is taken from. If you’d like to learn more about SteadyClock FS, check out RME’s video on digital clocking for a deep-dive on the technical aspects of word clock.
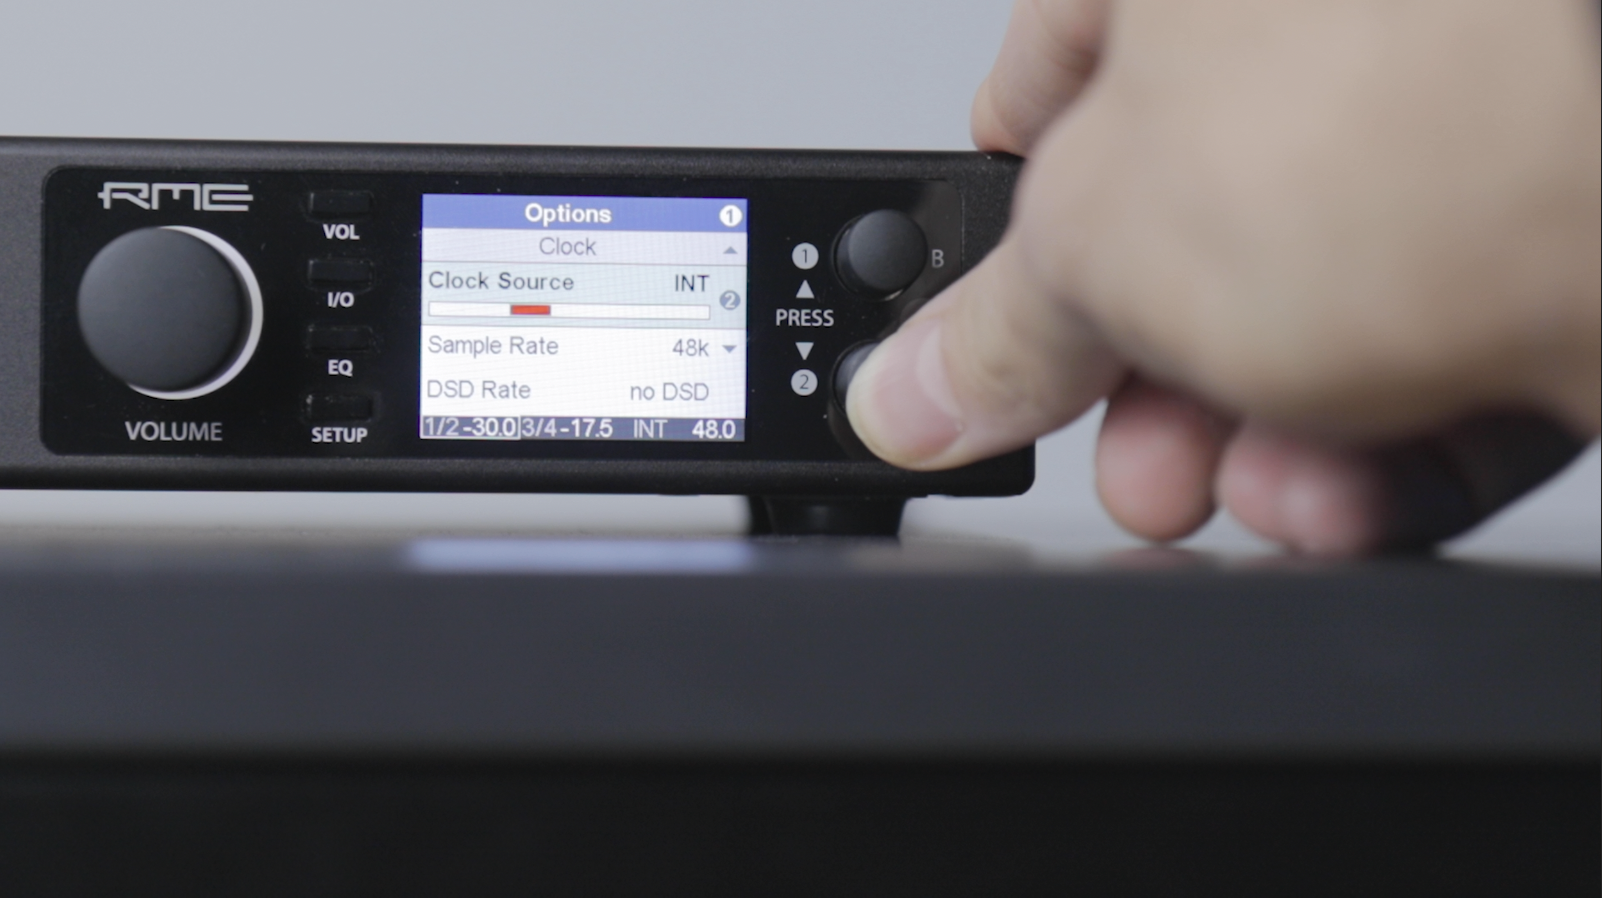
1 – Press the SETUP button on the ADI-2 Pro FS R.
2 – Use the encoders to find the OPTIONS menu and scroll to the CLOCK section.
3 – Change “clock source” to internal so that the Pro is Clock Master.
4 – Set the sample rate, which in the tutorial has been selected as 48kHz.
 RME Fireface Settings
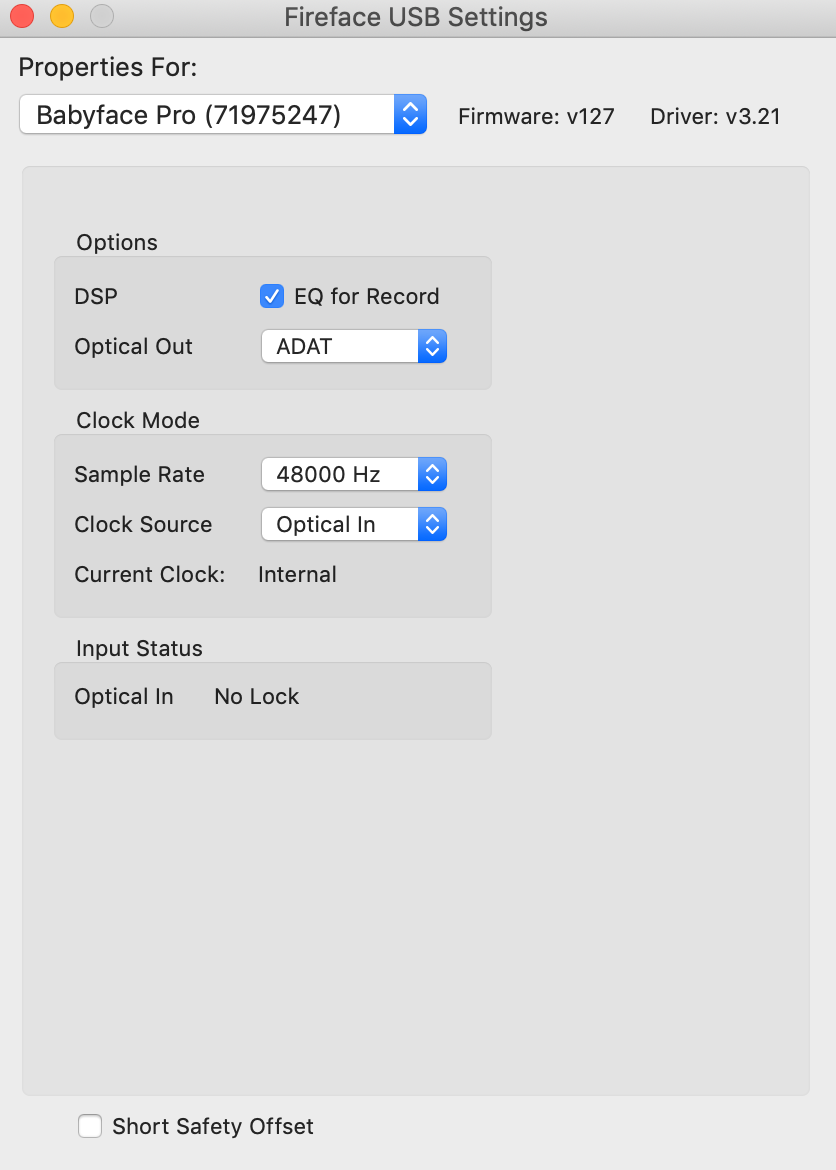
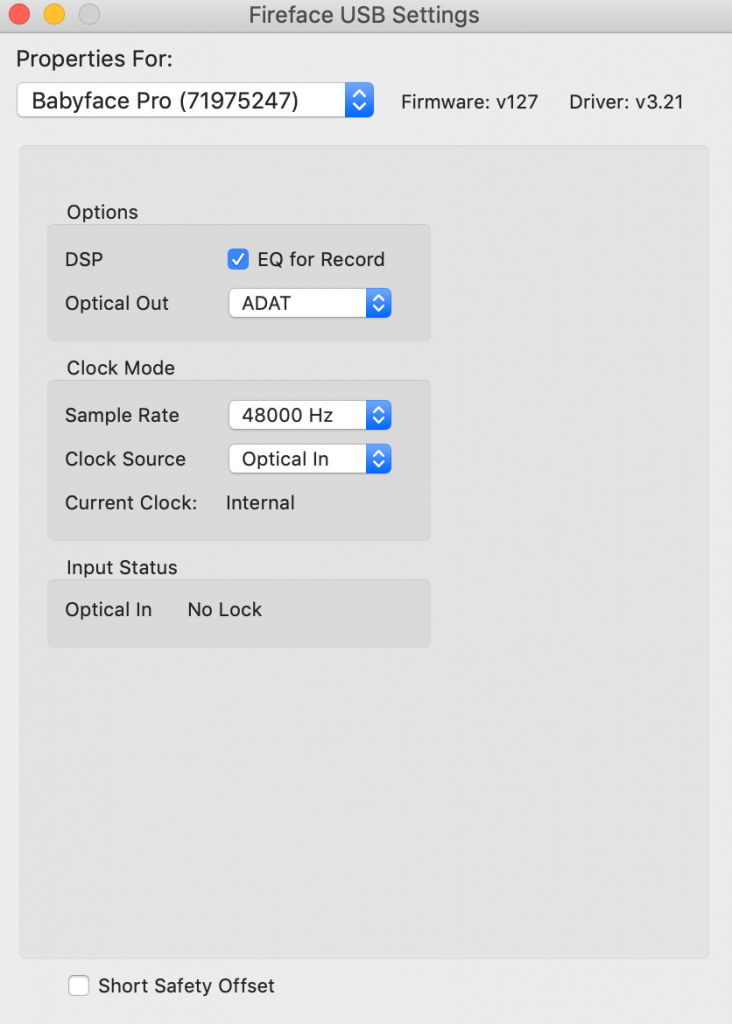
Using the ADI-2 Pro FS R as Clock Master requires a slightly different configuration to the RME ADI-2 DAC through the RME Fireface Settings dialogue.
1 – Find “Clock Source” and make sure this is set as “Optical In”. This means our audio interface is now taking it’s clock from the ADI-2 Pro FS R.
2 – It is important to make sure the Sample Rate matches that which has been set on the ADI-2 Pro FS R in the previous device configuration (in this case, 48kHz).
Note that if you aren’t using an RME interface, you won’t have access to RME Fireface Settings. Instead, configuraton would be done using your interface manufacturer’s method. Check your interface’s manual to find out how this is achieved.
Configuring TotalMix FX
Similarly to the Fireface Settings program, if you aren’t using an RME interface, you won’t have access to TotalMix. Refer to your interface’s manual to find out how to route audio to the ADI-2 Pro from your interface.
It’s worth noting that in the tutorial video the ADI-2 Pro FS-R is attached to output AS 1 / 2. This is because on the Babyface Pro, the digital output combines both the ADAT and SPDIF formats (hence the A in AS being ADAT and the S being SPDIF). On other interfaces, this might be shown as ADAT 1 / 2.
Likewise, if you have chosen to use another format like AES, you will need to use the AES output in TotalMix.
As with the ADI-2 DAC above, we’re going to assign our AS 1 / 2 channels to the Control Room section of TotalMix, which offers a number of useful features typical of a recording studio (such as Monitor Dim and Mono).
We’ll make use of these features by assigning our AS 1 / 2 channels as the Main Output in TotalMix (which is being fed to the ADI-2 Pro FS R).
1 – Find the Control Room section in the bottom right of Totalmix.
2 – Click the “assign” button and from the “Main Out” list and select AS 1 / 2 (or ADAT 1 / 2, depending on your interface). We’d also recommend turning the fader all the way down at this point (or the volume on your DAC fully down), to make sure you don’t accidentally send a very loud signal to your DAC.
3 – Now that the Main Out is set, we’re going to route some audio to the DAC.
4 – The sub mix for the Main Out should also now be selected (as indicated by a slightly lighter gray colour), but if not simply click anywhere around the fader to select it.
5 – Play back some audio from your Mac or PC, the level of which will be shown in the Software Playback row (middle row of TotalMix).
6 – Turn up the fader attached to this channel to route the signal to the Main Out, which should now also be receiving a signal.
7 – Now slowly turn up the Main Out’s fader, to send this signal to the ADI-2 DAC, and if neccesary turn up the volume on the DAC. The audio signal should be visible on the DAC’s spectral analyser, as well as being audible through any monitors or headphones you have connected to the DAC.
8 – When using the ADI-2 Pro FS R’s analogue inputs for recording, input signals will be visible in TotalMix FX on the Hardware Input channels AS 1 / 2 (or ADAT 1 / 2, depending on your interface), in the top row of TotalMix.
 How to use the RME ADI-2 Series in Class Compliant Mode
Both the RME ADI-2 DAC FS and RME ADI-2 Pro FS R can be used as USB class-compliant audio devices. This means that they can both be plugged directly into a computer – or even a phone or a tablet – and used as a playback device via USB (as well as for 2-channel recording in the case of the ADI-2 Pro FS R).
To use the ADI-2 DAC or Pro FS R as a class compliant device, you just need a USB B-type cable.
1 – Plug your ADI-2 unit directly into your computer and it will be automatically be recognized, without the need for an interface.
2 – If you’re on a Mac you can skip this step, however Windows users may want to download and install RME’s MADIface driver (Windows uses Microsoft’s WDM driver by default). This is an optional ASIO driver, providing better support for a wider range of audio software, and is also necessary for sample rates higher than 384kHz.
To find the driver, simply go to www.rme-audio.de/downloads, select your device from the drop-down menu, choose Windows as your operating system, then download and install the driver (current version is “driver_madiface_win_09736.zip” at the time of writing).
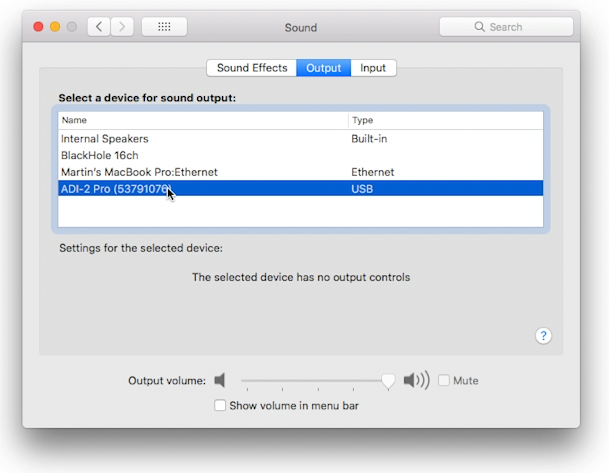
3 – To make sure that the sound is being sent to the ADI-2 DAC or Pro FS R, go to your computer’s sound settings and make sure that your device is chosen as the output. On a Mac this will be via the System Preferences > Sound, whereas for Windows users you’ll need to use Sound Settings.
The sample rate can also be changed and set here. You may also be able to change the sample rate via the settings of any program you’re using – whether that’s a DAW, or a media player like Tidal or Spotify – although be aware this may differ depending on what software you’re using.
 RME ADI-2 DAC FS – Reference-class monitoring and home listening
The RME ADI-2 DAC FS takes the reference-class sound quality of the ADI-2 Pro FS R and adapts it to the needs of Hi-Fi enthusiasts. Rolling DA conversion, a USB DAC and headphone amplifier into one half-rack unit, the ADI-2 DAC FS is RME’s first product to solely focus on the needs of Hi-Fi users.
As the most versatile DAC available, the RME ADI-2 DAC FS offers balanced/unbalanced analogue I/Os, an Extreme Power headphone output, a super low noise IEM output, SteadyClock FS, 4-stage hardware output level control, DSP-based signal processing, external power supply operation, Class Compliant USB compatibility, sample rates up to 768 kHz as well as DSD and Direct DSD playback.
The ADI-2 DAC FS features one 1/4″ Extreme Power Output taken from the original ADI-2 Pro design, whilst adding a brand new in-ear monitor output stage. Its ground noise floor is an astounding 10 dB lower than the one of the Extreme Power output, output impedance is near zero Ohms, THD reaches new record lows, click-free on/off is included as well as volume ramp-up, and the sound quality with any IEM is just amazing.
The DAC also features “AutoDark”, a frequently requested addition from Hi-Fi enthusiasts. A Hi-Fi specific feature, AutoDark turns off the display, function keys, volume knob, even the standby button after 10 seconds of no user operation when AutoDark is activated in the unit’s menu.
Learn more about the RME ADI-2 DAC FS
 RME ADI-2 Pro FS R – Mastering-grade AD and DA Conversion
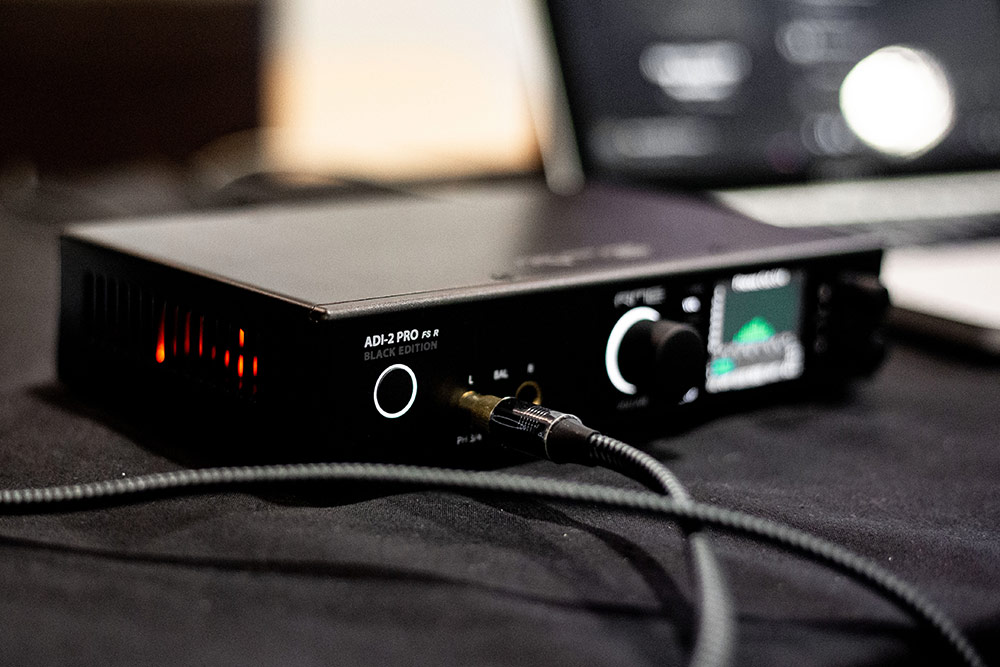
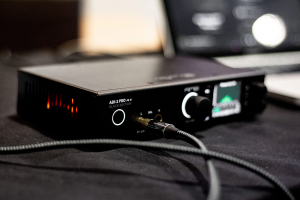
Representing the pinnacle of RME’s conversion technology, the RME ADI-2 Pro FS R combines a reference class AD/DA converter, USB DAC and headphone amplifier into one half-rack device. Its diminuitive size means it can find a place in even the smallest setup, whilst its all-black exterior make means the ADI-2 Pro is just as at home on the shelf with hi-fi equipment as it is racked in a mastering studio.
Continuing RME’s commitment to creating devices that are as flexible as they are powerful, the ADI-2 Pro FS R features a wide selection of digital and analogue I/O. On the analogue side, the ADI-2 Pro includes two servo-balanced analogue inputs on combo XLR / TRS jacks, two separate balanced and unbalanced outputs on XLR and TS, and two stereo Extreme Power headphone outputs. Digital connection is available in the form of an optical SPDIF I/O that also understands ADAT, and coaxial SPDIF (RCA) and AES I/O (XLR) via an included breakout cable.
The ADI-2 Pro FS R is also packed with a heap of on-board DSP processing. RME have incorporated 5-band parametric EQs for fully individual phones compensation, adjustable Bass/Treble controls with quick access, a binaural crossfeed function, adjustable loudness filter, selectable AD/DA filters, four discrete I/O reference levels, auto reference level setting, auto balanced phones mode, and many more. With all its processing power and sound-shaping capabilities, the ADI-2 Pro’s transparent sound signature creates the perfect foundation to adjust the sound of your unit to match your particular taste.
The front panel’s headphone outputs have been specially designed with 0.1 Ohm output impedance, a maximum output level of +22 dBu, and a maximum output power of 1.5 Watts per channel. These Extreme Power Outputs feature a THD far below -100 dB (0.001%) even at full power, for the most clear and detailed soundstage possible.
Both of the ADI-2 Pro’s headphone ports can be combined and used in an Advanced Balanced Headphone mode. This makes the ADI-2 Pro FS R the perfect headphone amp for users of balanced headphones, delivering a balanced signal path from the DAC straight to the phone, with 3 dB gain in Signal to Noise Ratio.
Learn more about the RME ADI-2 Pro FS R
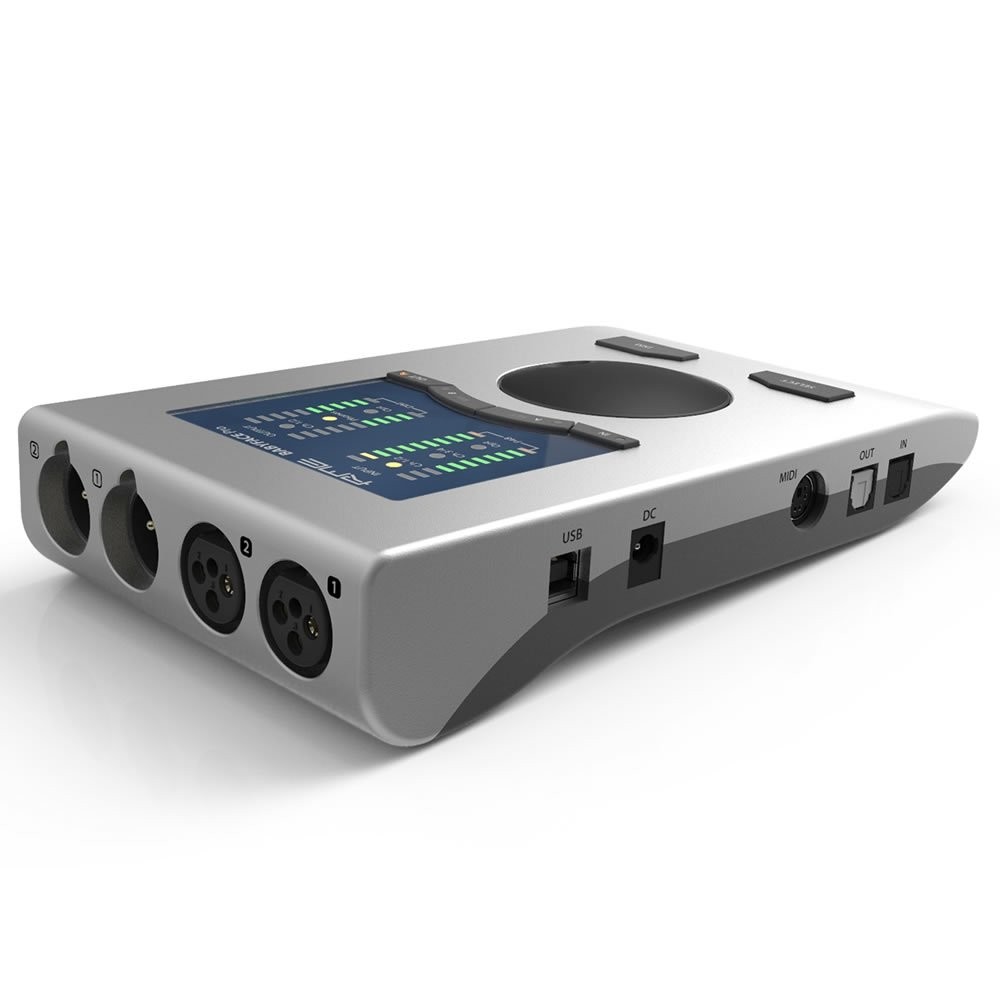
RME Babyface Pro FS
(24-channel USB audio interface for Mac and Windows)
RME Audio Interfaces
Much like the ADI-2 Series, RME’s range of USB audio interfaces are both flexible and powerful. Ranging from the portable 24-channel Babyface Pro FS (which we use in this tutorial) all the way to the incredible 394-channel MADIface XT, the RME audio interface range has a device to fit any scenario.
RME has long been known for its reliability and commitment to constantly updating their drivers to work with the latest operating systems. This has resulted in products from as far back as 2001 still working perfectly to this day.
Similarly to the ADI-2 series, RME’s audio interfaces fit a large amount of analogue and digital I/O into compact form factors. This design ethos has led to some unique product features across the range. The Babyface Pro FS is also entirely bus-powered giving you a truly portable professional-grade audio interface, whilst the all-new Fireface UCX II can operate entirely standalone without a computer.
All of RME’s audio interfaces also feature TotalMix FX. Designed as a software equivalent of a mixing console, TotalMix gives users the ability to route audio from any input to any output, as well as the creation of independent submixes for every output. The majority of RME’s interfaces also feature a selection of on-board effects, with EQ and dynamic controls on every channel, alongside reverb and delay as sends.
Learn more about RME Audio Interfaces
 5 Year Warranty (UK Only)
Over the past 20 years, the word ‘reliability’ has become synonymous with the RME Audio brand, thanks to both the exceptional build quality and the now industry-renowned, rock-solid drivers.
For this reason, we are happy to offer all of our UK customers a complimentary 5 year warranty on all RME products, when purchased either from ourselves, or from one of our authorised UK dealers, and remain the only interface manufacturer to offer this at no extra cost.
To activate your 5 year warranty, simply register your RME device with us within 30 days of purchase via our warranty page.
To ensure you are buying your device from a UK-based retailer, please check our list of authorised UK dealers before purchase.