


In part 2 of our new Synthax Explains video series we take a look at microphone preamps. What are they, and do you need one for your studio or live recording setup?
Another essential tool in the studio, microphone preamps come in many different shapes and sizes. From single-channel devices designed for recording with just one microphone at a time, to multi-channel units that enable the recording of several musicians or sources simultaneously, there’s a wide variety available and at a number of price-points.
As the name suggests, microphone preamps are devices that allow you to connect microphones for recording, and can be found built into various recording studio hardware such as audio interfaces and mixing consoles.
They’re also available as standalone devices, and come in the form of portable and desktop units; modular devices like the 500 series; combi devices with tonal controls known as ‘channel strips’, and which often emulate the preamps found on classic mixing consoles; and of course the classic 19” studio rack-mount.
But what exactly is a microphone preamplifier, and do you need one? There’s a number of key features to look out for, so read on for an introduction or check out our video below.
For an introduction to audio interfaces, see part one of Synthax Explains here.
What is a microphone preamp? Synthax Explains Video
See more videos at Synthax TV
What is a microphone preamp?
A microphone preamplifier is a device that amplifies the weak, low-level signal produced by microphones to that of ‘line level’, which is the name given to the standard operating level of most equipment you’ll find in a recording studio, such as mixing consoles, audio interfaces and other studio outboard (effects processing units like EQs and Compressors).
Most microphones produce signals that are too quiet to record on their own – to make this signal loud enough for us to use in recording and mixing, we need to boost it up to the same level of other equipment in the studio. At its most basic therefore, a microphone preamp simply takes a microphone signal and makes it loud enough to record.
Also referred to as a ‘preamp’, ‘mic pre’, or even just a ‘pre’, microphone preamps can be found in a variety of configurations. Some have a single XLR input, whilst others allow you to record 2, 4, 8, 12 and more channels simultaneously. There’s also a number of different types available – valves or vacuum tubes, transistors and solid state, IC designs, analogue or digitally controlled, and even specialist digital microphone preamps.
Do I need a microphone preamp?
As mentioned above, both audio interfaces and mixing consoles will usually have microphone preamps built in already. If you have an audio interface or a mixing desk in your studio, you may therefore not require an external mic pre at all.
So, what are some of the reasons you might buy a standalone mic pre?
 Sound Quality
First off, the sound quality of a dedicated preamp will likely be higher than that of your interface or mixer’s built-in preamps, and may also have features not found on your interface or console.
If you’ve read our previous article “What is an audio interface?”, you’ll know that an interface is essentially a kind of ‘all-in-one’ solution for music and audio production, combining a variety of components and circuitry into a single device – microphone preamps and instrument inputs, headphone amps and monitor controls, connections for interfacing with a computer, and other features like on-board DSP.
Audio interfaces are also usually designed to sit in a certain price bracket, and as such cheaper components will generally be used to keep the costs down. A standalone microphone preamp on the other hand, is a device built for a single purpose in the recording chain, with components chosen specifically to work together (in tandem with correct shielding and an optimised power supply), and will generally provide better results than those found on more ‘universal’ devices.
Entry-level interfaces and mixing desks in particular tend to offer less gain (more on that further down), and will likely have more noticeable noise in the signal when compared with an external pre. As a result, a standalone mic pre should be better at producing consistently clean recordings – even when working with quieter instruments – meaning you can record at a variety of levels, whilst maintaining excellent quality throughout.
More microphone connections (I/O)
The second main reason for buying an external microphone preamplifier, is simply because you need to record more channels.
Most audio interfaces (and smaller mixers) have a limited number of mic pres – if you want to record more microphones, you’ll need more microphone inputs. Whether you’re miking up a drum kit in the studio, or multiple musicians for a live performance, external preamps may be required to record everything at once.
Adding Character
The third reason often cited for using a dedicated preamp, is because of the effect it has on the sound of a recording. Like a lot of analogue equipment, some preamps are known to add a pleasing tonal quality to a recording in the form of added harmonics, and many studio engineers love to experiment with running different microphones through different preamps.
Preamps that use valves or vacuum tubes for example, are often said to impart a variety of different ‘flavours’ to a recording – words like ‘warm’, ‘airy’ or ‘3-dimensional’ are often used – and can provide a form of compression when overdriven, rounding off transients and smoothening the high-end frequencies (although it’s worth noting that some valve preamp designs can be extremely ‘clean’ sounding as well).
 The downside of valve preamps is that they tend to need servicing every couple of years, especially if used regularly. Valves can wear out, and often begin to sound duller over time, meaning they’ll need replacing every so often to bring the device back to its original tone. Valves are also more susceptible to damage during transit, and can easily become loose (or even break) if not carefully looked after during transportation.
Solid states (transistors or ICs) on the other hand tend to be extremely transparent, capturing the sound of an instrument (or the microphone used to record it) in its truest form. These types of preamps are designed to keep input noise to a minimum, amplifying signals with minimal distortion.
Solid states are usually favoured by engineers opting for a natural, neutral or ‘uncoloured’ sound, and remain popular with classical recording engineers, and others who specialise in more technical or dynamic acoustic recordings. Solid states also require little if any servicing, and should last for many years if well-looked after.
 Main Features of a Microphone Preamp
Gain
Gain control will usually be offered on the front panel of a mic pre in the form of rotary encoders for each channel. As mentioned above, the main purpose of a microphone preamp is to boost the quiet level produced by a microphone to a more useable level for recording, with most requiring anywhere between 30 – 60dB of gain to be brought up to line level.
Some microphones may require even more – such as certain models of ribbon microphone – with some preamps in turn offering up to 80dB of gain.
Increasing the gain will also increase noise in the recording signal – other sounds unintentionally picked up such as background noise, or electrical interference, as well as the internal noise (‘hiss’) produced by electronic devices.
The quality of a microphone preamp often becomes more noticeable at higher gain settings – cheaper preamps tend to be fine operating at lower levels of gain, but can be more difficult to work with at settings above 40-50dB, and noise can become a significant factor.
High quality preamps suffer far less in this regard – RME’s preamps for example are well-known for their low-noise characteristics, even at incredibly high gain.
Analogue or Digital Gain?
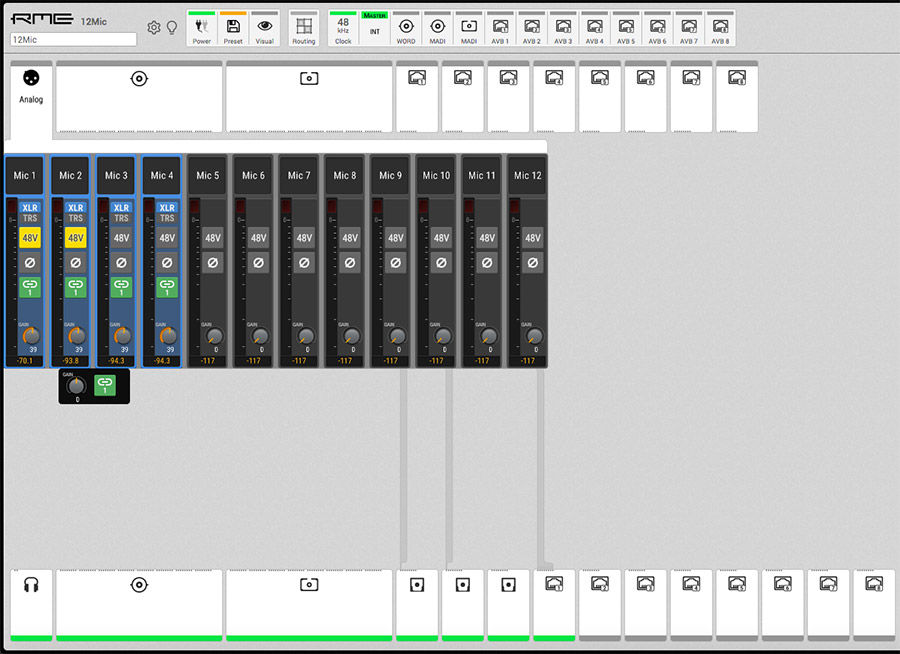
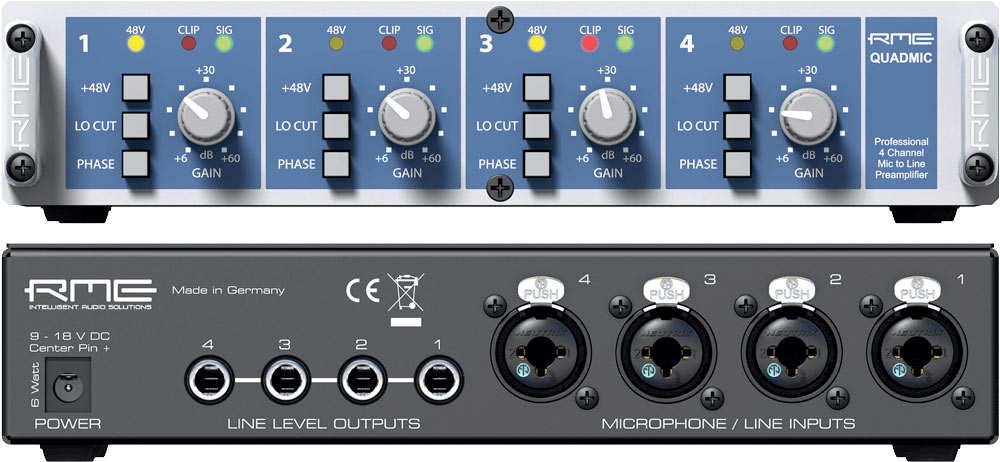
It’s worth noting that preamps can also feature analogue or digital gain controls. Several RME devices feature analogue gain pots on their front panels, such as the RME Octamic II and QuadMic preamps, and the RME Fireface 802 interface.
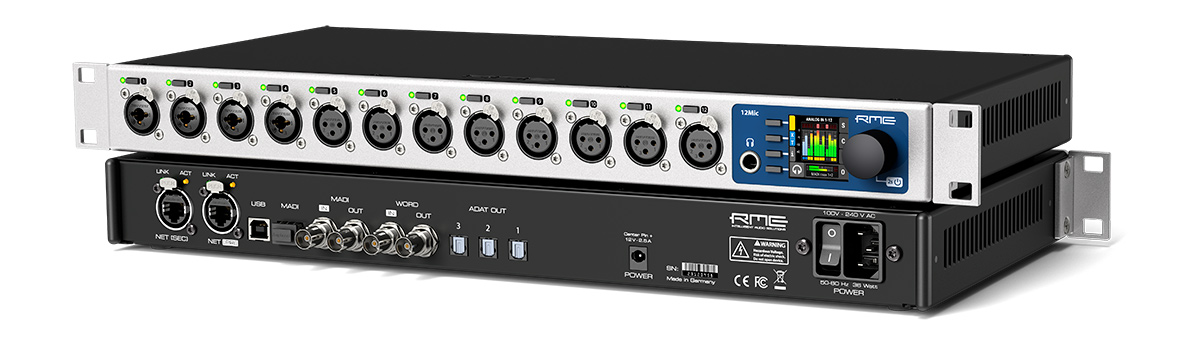
Other devices feature digitally-controlled preamps, such as those found on the RME Fireface UFX II and UFX+ interfaces, or the OctaMic XTC and RME 12Mic preamps. There are two main obvious benefits to digitally-controlled preamps – one is that their settings can easily be saved and recalled. The other is that they’re easily remote controllable, a feature that can be particularly useful in studio and live recording, as well as in location recording applications.
48V Phantom Power
There are three primary types of microphones – dynamic, condenser and ribbon. Of these microphones, condensers require additional power to operate. This is where Phantom Power comes in, which was invented to allow DC current to be sent via an XLR cable to a microphone, removing the need for an external power supply.
Most microphone preamps will feature a Phantom Power button, often marked as 48V, which when pressed will send power to a condenser mic.
Note that it’s recommended to always connect your microphone first before turning on phantom power, as well as switching phantom power off before disconnecting your microphone. This helps protect against surges or spikes in current when phantom power is switched on and off, which can damage a sensitive condenser microphone’s input stage.
Equally of note is that Phantom Power shouldn’t be used with Ribbon microphones, as this could cause serious damage.
 Phase or Polarity Switch
Another feature of a microphone preamp is a polarity or phase reverse switch – often labelled with the symbol Ø – which can be useful when a cable has been wired incorrectly, or when working with multiple microphones, such as recording a drum kit, or combining multiple mics on a guitar cab.
Depending on the distance that each microphone is placed from the source it’s recording, sonic vibrations will hit the diaphragm of each mic at different times. When you combine these tracks together, some frequencies may cancel each other out, resulting in a sound that’s audibly weak, ‘tinny’ or ‘boxy’.
A classic example is recording a snare drum with two microphones – one on top, and one underneath. Blending these two tracks together allows you to capture the instrument in its fullest – however, when you raise the fader of your second mic, you find you actually have a weaker, or unnatural sounding snare, a result of the second microphone cancelling out some of the frequencies of the first. The phase invert switch can help correct this, as flipping the polarity of the second mic’s signal will bring it back into phase with the first, which should give you a fuller or more natural sound.
It’s also worth noting that although this switch is generally referred to as a ‘phase invert’ or ‘phase reverse’ switch, technically what it’s actually doing is inverting the polarity of the microphone signal. The correct technical term is probably therefore something like ‘polarity switch’, however most engineers will refer to it as a ‘phase reverse’, ‘phase invert’ or ‘phase flip’, and you’ll see these not only on mic pres, but also on mixing consoles, channel strips and in DAWs.
Pad switch
Another switch you’ll often see on a microphone preamp is the pad switch. This is an input attenuator – i.e., it reduces the gain of your microphone by a specified level – and may alternatively be labelled something like ‘-20dB’, indicating how much gain reduction will be applied.
Some mic pres and microphones may also have multiple pad settings, such as -6dB, -12dB etc. You can also get ‘inline pads’ – adapters that connect in between the microphone and preamp.
The pad switch is useful when you need to reduce a signal that’s too strong or ‘hot’. Some audio sources are extremely loud – a kick drum for example – and may overload the input signal on a mic pre during recording, even at low gain. The pad switch gives you an additional gain reduction – just remember to keep the fader to your main speakers low when switching a pad in and out, unless you want to frighten the life out of anyone else in the vicinity (and potentially damage your speakers), as turning it off will result in a sudden increase in level.*
* Particularly important when working with a live PA system!
Low-cut Filter / High-Pass Filter
Many microphone preamps will feature a built-in low-cut or high-pass filter. This will usually be a fixed frequency of something like 80Hz, and allows you to remove any undesirable low-end rumble being picked up by the microphone.
Other Features
Front Panel Control
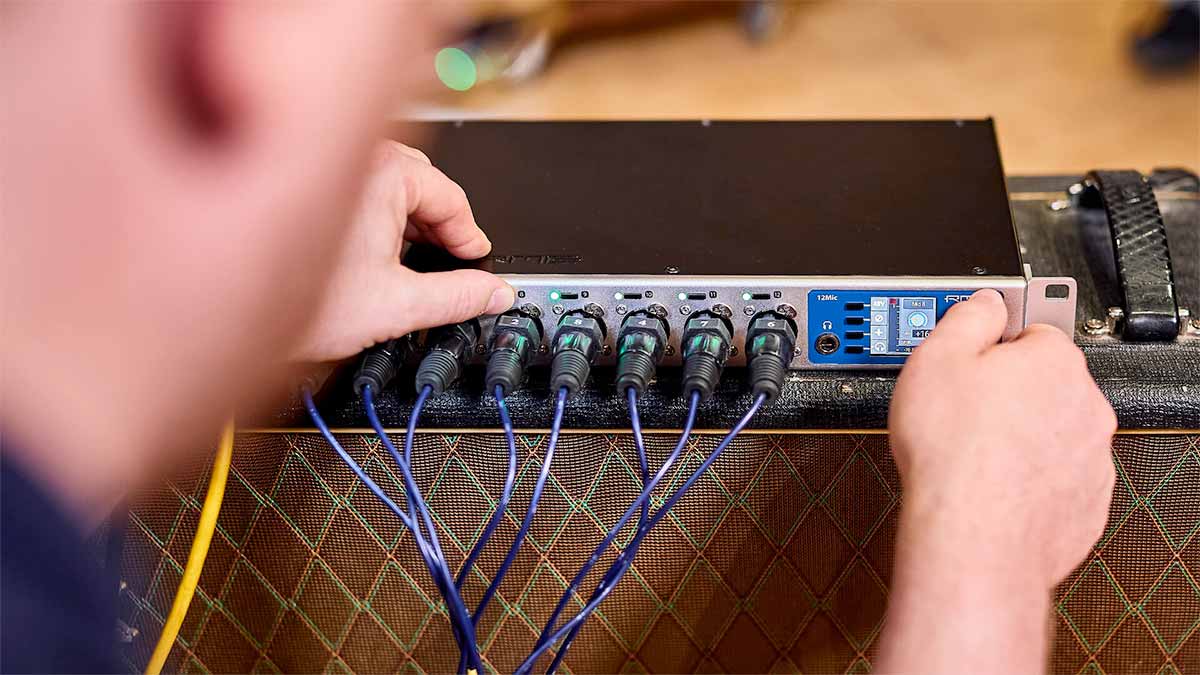
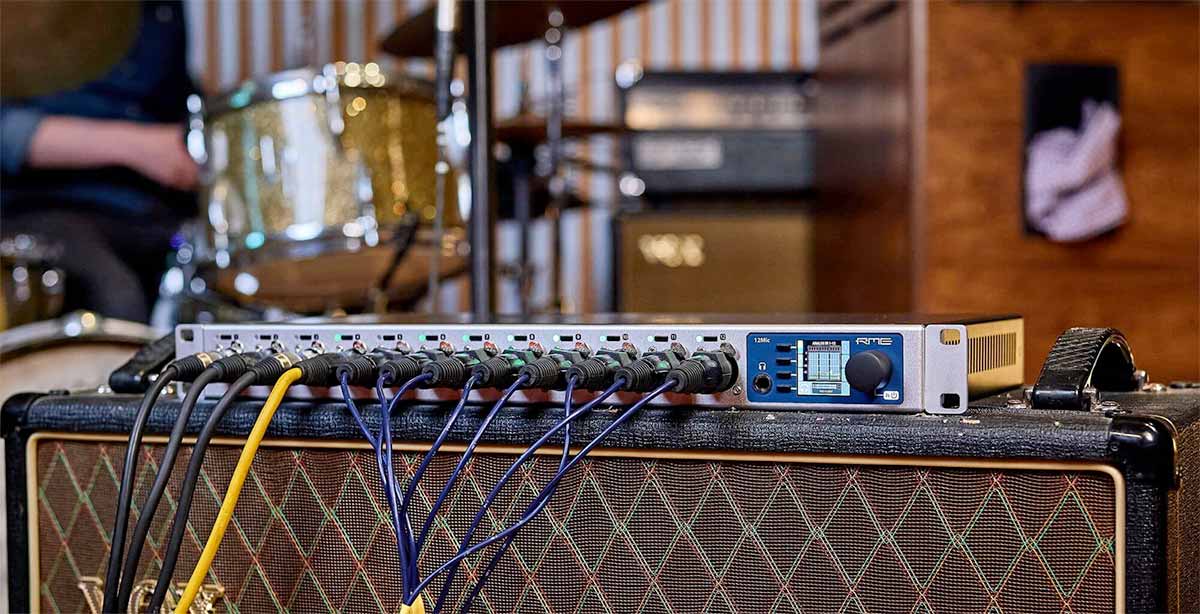
Some microphone preamps, like RME’s Octamic XTC and 12Mic, feature additional front panel controls, which allow for other features depending on the preamp.
This can be things like channel routing, which allows you to send your microphone signals to multiple output destinations at once, as well direct monitoring, and the creation of gain groups (allowing multiple microphones to be controlled from a single encoder or fader).
Remote Control
As mentioned above, RME’s digitally controlled preamps can also be remote controlled, for example from a connected computer via USB, MIDI, or MIDI over MADI.
RME’s 12Mic also features next-generation networking capabilities via the AVB format, meaning parameters like gain, phase and routing can be controlled from anywhere on an AVB network.
We’ll be looking in more detail at digital audio formats in a later part of this series.
How to connect a microphone preamp
There are a few different ways to connect an external microphone preamp with an audio interface, mixing desk or A-D converter. This will usually be determined by the other equipment you have at your disposal, as well as the number of channels you wish to record (and at what sample rate).
 Analogue Connections
Some preamps – like the RME Quadmic II – will connect via analogue. This is achieved simply by taking the line-level output of the microphone preamp, and connecting it to any free line-level inputs on your audio interface (usually via TRS cables).
Be careful not to plug these into your interface’s microphone preamps, as your standalone preamp has already boosted the signal to line level.
Digital Connections
Many other higher channel-count preamps – like the Octamic XTC and 12Mic – use digital I/O to make it simpler to transfer a high number of channels over a small number of cables.
For instance, the RME Octamic XTC features both ADAT and MADI. Connecting via ADAT allows for all 8 channels (at 44.1 kHz or 48 kHz sample rates) to be sent to an interface using a single optical TOSLINK cable. MADI allows for up to 64 channels at the same sample rates, meaning up to 8 x OctaMic XTCs can be connected in series.
We’ll be covering both ADAT and MADI in a later part of this series, both of which provide very simple methods of digitally transferring audio between devices in the studio.
Choosing a Microphone Preamp
If you already own a high quality audio interface, chances are it’s built-in preamps will be perfectly suitable for most of your recording needs. The preamps built into interfaces like the RME Fireface UFX+, Fireface UCX II and Babyface Pro FS for example are all of excellent quality, offering transparent audio capture and plenty of gain.
If professional-level transparency is your aim, the RME 12Mic represents the current state-of-the-art from RME, and can be paired with the Fireface UFX+ via ADAT or MADI to form an extremely powerful recording setup. Other models from RME – like the OctaMic II and QuadMic – provide a more affordable option, whilst retaining RME’s trademark neutrality.
See the full range of RME Audio Interfaces
See the full range of RME Microphone Preamps