


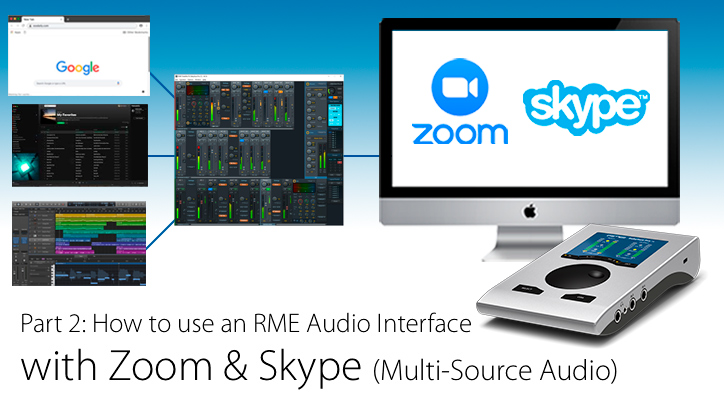
 We look at how you can send any audio from your Mac or PC (DAW, Web Browser, Spotify etc) to Skype or Zoom with an RME Audio Interface.
In the first part of this series on collaborating remotely, we looked at how you can use an RME audio interface with Skype and Zoom. If you haven’t seen part one, we recommend taking a look at the first to familiarise yourself with the basic concepts.
With our second video, we outline the steps for sending audio straight out of your DAW and into your video app, allowing you to share your recording projects with another artist or client. What’s more, this approach actually allows you to send any audio in your Mac or PC straight to Skype/Zoom, be it from a media player like Spotify or iTunes, or your web browser (e.g. audio from a YouTube video).
The simplest way to achieve this is by using TotalMix FX’s loopback feature. As you might know from part one, Loopback allows any audio that’s routed to a particular output to be sent back to its corresponding input via the interface’s on-board DSP, similar to a ‘virtual patchbay cable’.
If you haven’t already, check out part one for a walkthrough on how to get started with using your RME Audio Interface with Skype or Zoom.
If you’re having problems following the steps outlined in this latest video, scroll down to see the text version below.
Part 1: How to use Zoom and Skype with an RME Audio Interface (Mac/PC)
Part 3: High-Quality Audio with Zoom/Skype and an RME Audio Interface (Source-Connect Now)
Part 4: Recording Skype and Zoom in your DAW with an RME Audio Interface
See more videos at Synthax TV
How to share any audio from your DAW, media player or web browser via Skype or Zoom
1 – Open TotalMix FX and make sure you have the first software playback channel (AN 1/2, middle-row of TotalMix) routed to the first hardware output (AN 1/2, bottom-row of TotalMix).
2 – Next, click the spanner on the output channel, and select the Loopback button to activate it. Now, any audio routed to this output will be sent back to the AN 1 / 2 input (top-row of TotalMix), which is the input used by Skype and Zoom for audio.
This includes all microphones and any instruments connected to your interface. Guitars, keyboards etc – all of those sources can now be shared directly into Zoom or Skype. Simply make sure you have the Output AN 1/2 selected in TotalMix, and raise the faders on any active channels in the top and middle rows to send their audio into Skype or Zoom.*
3 – It’s worth noting that although the signal from the output is being routed back into the input, the metering will not change on the input in TotalMix FX. This is because the metering is still occupied by anything connected to the physical input on the audio interface.
4 – To test the setup, open Skype/Zoom’s audio preferences, and you should now see a signal from any audio you have playing (Spotify in our above video) via the video app’s microphone input level. Your recipient(s) will therefore be able to hear any audio your machine you have successfully routed.
* A note about using Fireface Series line inputs with Zoom on a Mac
Please note: There is a caveat with this approach for Fireface users (UC, UCX, 802, UFX II and UFX+) when using Zoom on a Mac. It seems that due to the way Zoom have implemented the core audio driver, all physical line inputs on the back of any of the Fireface Series interfaces will actually be picked up by Zoom automatically, meaning you can’t use TotalMix to mix the level of these input signals.
This does not seem to apply to the front four Mic/Line inputs, nor does it affect Babyface Pro, and only seems to apply specifically to Zoom on a Mac (not Skype, nor for PC users for either software). For a workaround to this issue, scroll down to the end of the article.
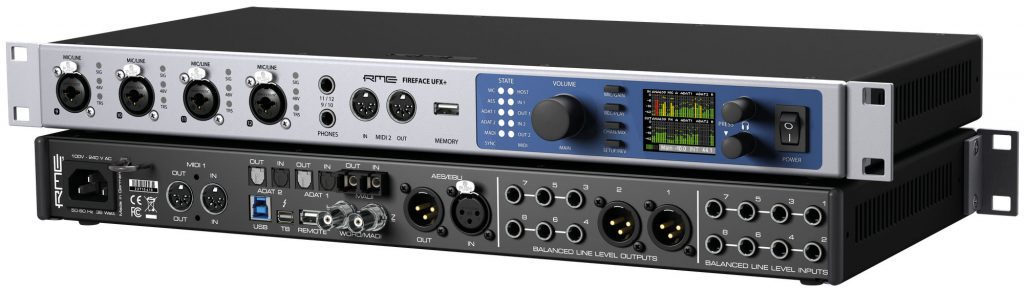
The RME Fireface UFX+ is RME’s flagship audio interface – 188 channels
of transparent audio for Mac and PC with ADAT, MADI, USB 3 and Thunderbolt connectivity.
 Sending your DAW, Web Browser, Spotify etc to their own individual channels on a Mac
1 – When you’re using your DAW, you can easily change which Software Playback channel the audio from your DAW appears on in TotalMix, simply by changing the output of your Master channel in your project (e.g. to AN 3/4, moving the DAW’s stereo output to the second stereo pair in TotalMix). This gives you the added control of your DAW having its own dedicated fader.
For other apps like your web browser or Spotify, sadly it’s not that simple (on a Mac), as they lack an ability to output more than two channels of audio, and will always use the first two channels of an audio interface or soundcard by default. You’ll therefore find that any other apps you have running will all share software playback channel AN 1 /2 as their output.
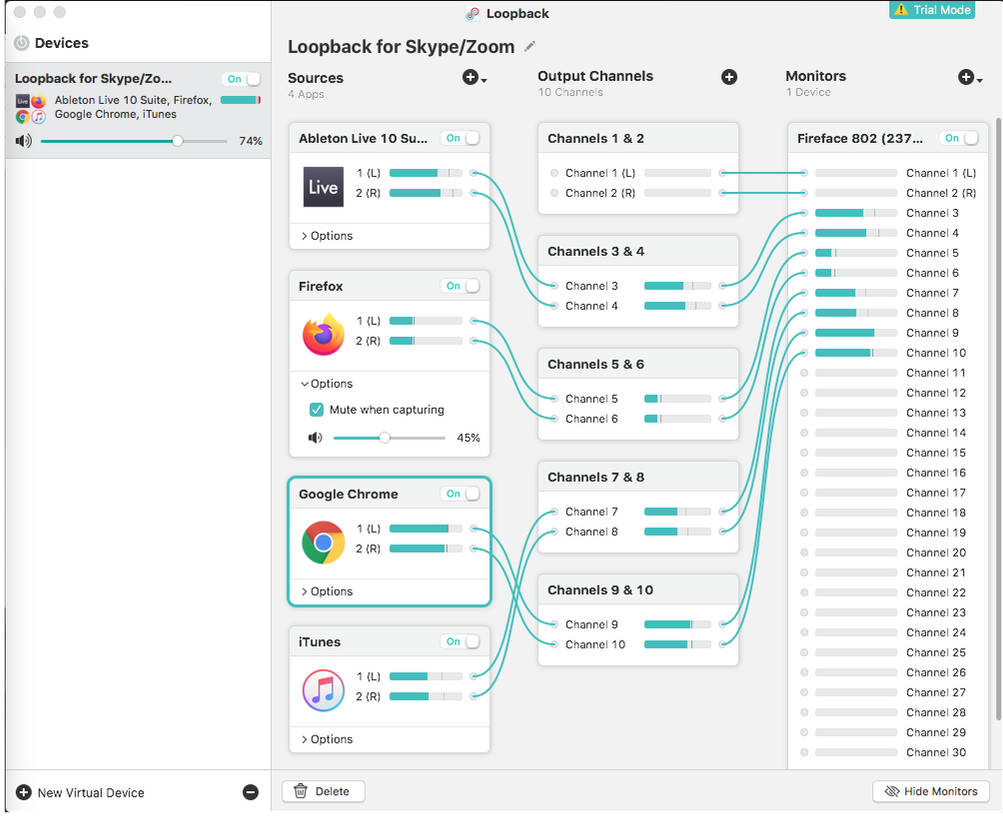
2 – As mentioned in the above video, there are a number of third-party apps available that will allow you to re-route the internal audio of your machine to different software outputs in TotalMix FX.
We’ve been trying this out with a piece of software – also called ‘Loopback’ – by a company named Rogue Amoeba. This app gives you the ability to change any software’s default output, and therefore the software playback channel you’d like each individual app to use in TotalMix FX.
So for instance you can have your web browser, iTunes and DAW all on separate playback channels, giving you dedicated level controls for each one.
 Soundflower: A workaround for Zoom’s use of all rear-panel line inputs
As mentioned in the ‘Please note’ above, it would seem that Zoom does in fact register audio from the line inputs found on the rear panel of any of the Fireface units. This does not apply to the four front-panel inputs, or the line/instrument inputs found on the Babyface Pro / Pro FS.
A workaround for this issue is to use the virtual audio driver ‘Soundflower‘, and simply use your DAW for mixing all of your physical inputs (mics and instruments).
1 – Download and install Soundflower.
2 – Open the Audio MIDI Setup app (use your Mac’s spotlight search if you can’t find it).
Once in Audio MIDI Setup, make sure you have the ‘Audio Devices’ section open (File Menu > Window > Show Audio Devices, or use the cmd+1 keyboard shortcut).
3 – Now, create a new Multi-Output Device by clicking the + symbol in the bottom-left of the window, and combine Soundflower with your RME interface by checking both options. For Soundflower, make sure you select the Soundflower (2ch) option, and not the 64 channel option.
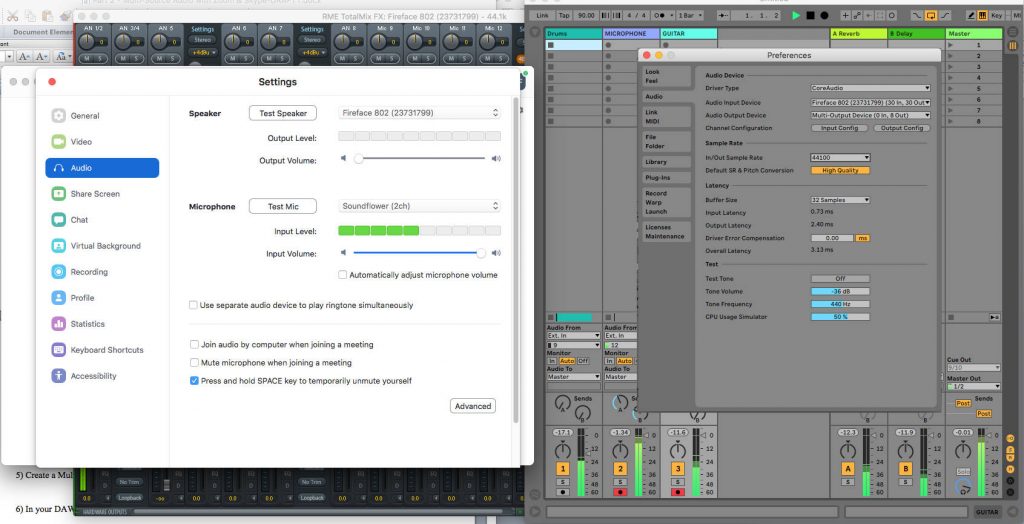 4 – Open your DAW and select your newly created Multi-Output Device as the project’s output.
5 – Set up channels in your DAW for your inputs (mic / instrument) and record arm them for monitoring.
6 – In Zoom’s preferences, set your microphone to be Soundflower (2ch).
This solves the problem and allows you to control the levels of all your inputs from your DAW. We’ve only tested this on a small project with a couple of channels, and so can’t really comment on how effective this would be with larger projects (i.e. ‘your mileage may vary’).
A better alternative may be to use a different app for your audio, muting any audio from Zoom and just using it for the video feed, which is what we’ll be covering in part 3.
That’s it for part 2, check out part 3 where we’ll be looking at alternatives to Skype and Zoom for improved audio quality when working remotely.
Click here to see the full range of RME audio interfaces
Click here to see the full range of Lauten Audio Microphones
![]() If you’d like to know more about any of RME’s audio interfaces, soundcards, AD/DA Converters or microphone preamps, give us a call on 01727 821 870 to speak to one of our team or to arrange a demo.
If you’d like to know more about any of RME’s audio interfaces, soundcards, AD/DA Converters or microphone preamps, give us a call on 01727 821 870 to speak to one of our team or to arrange a demo.
You can also contact us here.